Phoenix and Ecto: From `mix new` to Heroku
In Deploying a Phoenix app to Heroku we looked at the absolute minimum necessary to get the Hello Phoenix app running on Heroku. This involved modifying config files and adding some environment variables.
Now let’s start over and deploy a slightly more realistic app, one that actually uses a database, so we can make sure everything works. We’ll be using Postgres and Ecto which is Elixir’s DSL for interacting with databases.
Note: This worked in mid-July 2015 with Elixir 1.0.4 and Phoenix 0.14.0. If it stops working at some point in the future, please let me know so I can update it or point readers to a more up-to-date resource!
Step 0: Prerequisites
Before you can begin, you need several things installed. These include but may not be limited to: Erlang, Elixir, Postgres, NodeJS, Heroku Toolbelt, Phoenix, and Git.
Here are some links to get you started:
- http://elixir-lang.org/install.html
- http://www.phoenixframework.org/docs/installation
- https://toolbelt.heroku.com
If you have any problems at all, ask in #elixir-lang on Freenode IRC, in the Phoenix channel in Slack, or on the phoenix-talk Google Group. If you don’t know how to find or use those, ask below in the comments or send me an email, and I’ll help you find the right place.
Now, let’s begin.
Step 0.5: Install the latest hex
One thing first! There was a bug in hex (the package manager) that was fixed Sunday morning 7/12, however depending on what you have downloaded recently, you may have the bad version. Execute this command to install hex locally:
$ mix local.hex
Now we can get started.
Step 1: Create a sample app and put it under version control
The first steps are the same, create a new Phoenix app and get it under version control:
$ mix phoenix.new my_app
...
Fetch and install dependencies? [Yn] Y
...
$ cd my_app
$ git init && git add . && git commit -m "Initial commit of Phoenix app"
Now if anything goes wrong, we can back up to this point.
Step 2: Choose a License
The next thing to do is to choose a license for your project. If your project has a chance of ever getting out in public, for example if you are going to put it on GitHub, it’s important to include a license so that someone coming upon it later understands what your intentions are and what they are allowed to do with your code.
I’ve been involved with The Apache Software Foundation for years and years, and I prefer the Apache License. Many projects (and Phoenix itself) use the MIT License. GitHub has an excellent Choose A License tool to help you decide.
Enough of my soapbox. If you’re going to, add your LICENSE file and commit it.
$ curl http://www.apache.org/licenses/LICENSE-2.0.txt > LICENSE
$ git add LICENSE && git commit -m "Add Apache License 2.0"
(If you’d like to automate adding the MIT license to your project, this looks like an interesting option: https://github.com/remy/mit-license .)
Step 3: Add a Users model
Let’s add a simple model for a User by following part of the Ecto Models guide.
$ mix phoenix.gen.html User users name:string email:string
$ git add . && git commit -m "Add generated User model"
The output tells us to
Add the resource to your browser scope in web/router.ex:

    resources "/users", UserController
Open web/router.ex and paste that line in:
  scope "/", MyApp do
    pipe_through :browser # Use the default browser stack

    get "/", PageController, :index
    resources "/users", UserController  # <------
  end
Remember to git commit your changes:
$ git add . && git commit -m "Add Users resource to browser scope"
NOTE: If you run into an Unchecked dependencies error at this point, see the Troubleshooting section below.
Step 4: Test locally
Provided you have Postgres installed and running locally, you can create the development database and run the migration. (The Ecto Models guide has all the details on this.)
$ mix ecto.create
$ mix ecto.migrate
At this point you can start the app with mix phoenix.server, visit the http://localhost:4000/users page, and check that adding, editing and deleting users works in the development environment.
Step 5: Modify prod configuration
The sample app generated by mix phoenix.new expects to import a prod.secret.exs file that we will not be using. Remove this section from config/prod.exs:
-
-# Finally import the config/prod.secret.exs
-# which should be versioned separately.
-import_config "prod.secret.exs"
Instead, add the following to prod.exs (copied and modified from config/prod.secret.exs):
# Configure secret_key_base for cookie-based session storage
  config :my_app, MyApp.Endpoint,
  secret_key_base: System.get_env("SECRET_KEY_BASE")

# Configure your database
  config :my_app, MyApp.Repo,
  adapter: Ecto.Adapters.Postgres,
  url: System.get_env("DATABASE_URL"),
  size: 20 # The amount of database connections in the pool
This tells Phoenix to get the DATABASE_URL and SECRET_KEY_BASE values from the environment, so that we don’t have to include passwords and keys in plain text in our source code. We’ll set those values a bit later.
Note: If your app is not named exactly my_app then you will need to modify the config lines above to match.
Remember to git commit your changes:
$ git add . && git commit -m "Update production configuration"
Step 6: Create the Heroku application
$ heroku create
You should see something like this:
Creating powerful-depths-1590... done, stack is cedar-14
https://powerful-depths-1590.herokuapp.com/ | https://git.heroku.com/powerful-depths-1590.git
Git remote heroku added
If this does not work, check that you have the Heroku Toolbelt installed.
(If you’re curious about what just happened, execute git remote -v to see the ‘remotes’ that were added to your local git repo.)
Step 7: Add Heroku buildpacks
A newly created Heroku application does not know anything about the language and frameworks used by the app. Buildpacks are used for this configuration, and have been provided by the community.
Add the Elixir buildpack first, followed by the Phoenix Static buildpack.
$ heroku buildpacks:add https://github.com/HashNuke/heroku-buildpack-elixir
$ heroku buildpacks:add https://github.com/gjaldon/phoenix-static-buildpack
Note: If heroku complains that buildpacks is not a recognized command, and you happen to be a Ruby developer who uses rbenv, then see if this helps.
Step 8: Add PostgreSQL to the Heroku app
Now add the PostgreSQL database to the Heroku application:
$ heroku addons:create heroku-postgresql
This will make the database available, but it will be empty. We’ll create the database tables and columns shortly.
Step 9: Set environment variables
Set the SECRET_KEY_BASE environment variable, which is used for cookie-based session storage.
$ heroku config:set SECRET_KEY_BASE=[copied from config/prod.secret.exs]
Step 10: Push changes to Heroku
At this point we need to push our changes to Heroku so that it will get the environment set up and build the app.
$ git push heroku master
Step 11: Create and migrate the database
Now that Elixir is installed, you have access to the mix command which is needed to run the following commands to create and migrate the database.
$ heroku run mix ecto.create
Running `mix ecto.create` attached to terminal... up, run.4208
** (Mix) The database for MyApp.Repo couldn't be created, reason given: Error: You must install at least one postgresql-client-[version] package.
.
Oops! This command results in an angry red error message. Fear not. According to http://stackoverflow.com/questions/17300341/migrate-not-working-on-heroku and in my experience, this can safely be ignored.
$ heroku run mix ecto.migrate
Running `mix ecto.migrate` attached to terminal... up, run.5618

15:51:38.879 [info]  == Running MyApp.Repo.Migrations.CreateUser.change/0 forward

15:51:38.879 [info]  create table users

15:51:38.932 [info]  == Migrated in 0.4s
Now the ‘users’ database table has been created.
Step 12: Success!
And finally:
$ heroku open
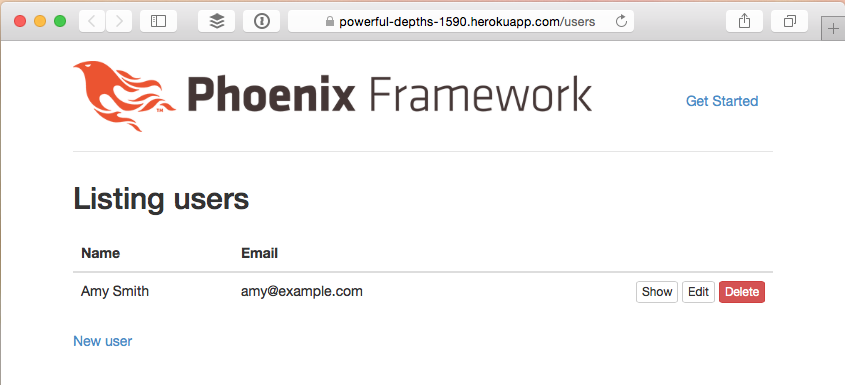
This should open the index page of your app. Add /users to the url and see it work, for example: https://powerful-depths-1590.herokuapp.com/users .
Copyright 2015 Wendy Smoak - This post first appeared on http://wsmoak.github.io and is licensed CC BY-NC.
References
- WIP Heroku deployment guide
- Ecto Models
- Heroku Buildpacks
- Elixir Buildpack
- Phoenix Static Buildpack
- Phoenix Sessions
Troubleshooting
If you see this error when trying to generate the model in Step 3…
Generated phoenix_ecto app
==> my_app
Unchecked dependencies for environment dev:
* postgrex (Hex package)
  the dependency postgrex defined

  > In mix.exs:
    {:postgrex, ">= 0.0.0", [hex: :postgrex]}

  does not match the requirement specified

  > In deps/ecto/mix.exs:
    {:postgrex, "~> 0.8.3", [optional: true, hex: :postgrex]}

  Ensure they match or specify one of the above in your MyApp.Mixfile deps and set `override: true`
** (Mix) Can't continue due to errors on dependencies
… it is due to:
3:31 PM [ericmj] there was a bug in hex that has been fixed
3:32 PM [ericmj] if you update hex it is fine, but if you fetched deps with the broken hex you may have a locked postgrex 0.9.0 which you dont want
The mix local.hex command we ran earlier should have prevented this, but if not, execute these commands to install the latest one again and unlock the postgrex dependency:
$ mix local.hex
$ mix deps.unlock
$ mix deps.unlock postgrex
$ mix deps.get