Using Stripe Checkout with Chargify
Stripe offers a JavaScript widget called Stripe Checkout that you can use to collect payment details. It sends the card data directly to Stripe and gives you a token so that you don’t have to handle card data on your own server. Let’s see how to integrate this with Chargify subscription signups and card updates.
This is an alternative to Chargify Direct, in which you post the entire form to Chargify’s servers and they redirect the customer back to you. Stripe Checkout still allows you to avoid extensive PCI compliance work (though some is still required!) and it gives you more control over the customer experience.
Prerequisites
You’ll need these things before we begin:
- A Chargify account. Sign up for a free Developer account if you don’t already have one.
- A Stripe account for testing. Sign up here if you don’t already have one.
- A reasonable comfort level with developing web applications in your language/framework of choice.
- A basic understanding of the Chargify API. Start here.
Create
To create a new subscription using credit card data that was captured by Stripe Checkout, you will need to design your own signup page and include the Stripe Checkout widget. When the button is clicked, the Stripe Checkout JavaScript will pop up a CSS overlay with fields to collect and tokenize the customer’s card data.
Here’s what it looks like:
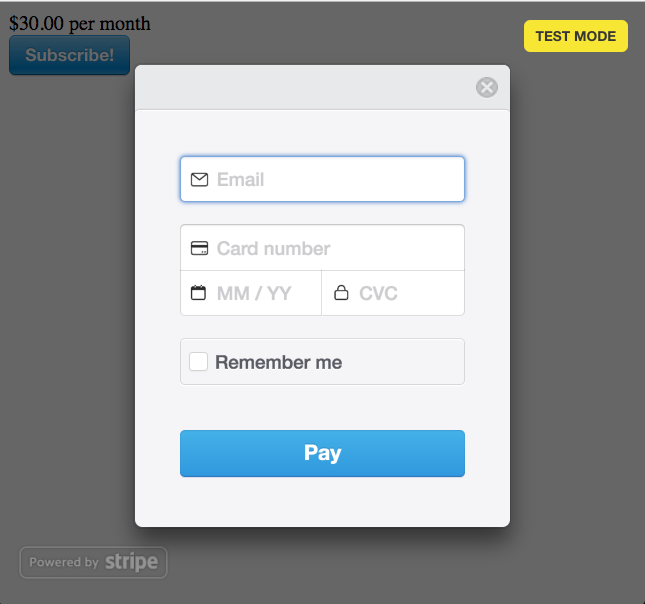
The minimum that Stripe will allow you to collect is an email address, however Chargify is going to require a customer first and last name. You can either configure Checkout to collect more information, or use something like “Valued Customer” if you don’t need the name for any other reason.
Hint: If you want a name and address, include data-billing-address="true".
Form Container
Keep in mind that the checkout script must appear inside an HTML form tag, since it will be inserting fields into the form. For example:
<form action="/charge" method="post" class="payment">
    <script src="https://checkout.stripe.com/checkout.js"
    class="stripe-button"
    data-key="<%= settings.publishable_key %>"
    data-label="Subscribe!"></script>
</form>
Note that we’re using the data-label attribute to change the text on the blue button. You can also configure what fields appear in the popup.
When the user clicks ‘Pay’, the card data will be submitted directly to Stripe, and the response will be inserted into your <form> as hidden fields called stripeToken and stripeEmail.
When the form submits, those hidden fields will be sent to your server.
Note: You can include additional fields in the form, and they will also be submitted along with the ones Stripe inserts. For example, you may want to add a hidden field with the product handle if there is more than one that a customer might choose, or have visible fields that allow your customer to choose a size and color.
Server Side
When the form is submitted to your server, you’ll need to use the token that Stripe Checkout inserted to create a customer record in Stripe.
  customer = Stripe::Customer.create(
    :email => params[:stripeEmail],
    :card  => params[:stripeToken]
  )
Assuming it is successful, the result will contain a customer. The customer’s id is what Chargify needs in order to process payments and renewals, and is supplied as the ‘vault_token’.
  subscription = Chargify::Subscription.create(
    product_handle: 'monthly-plan',
    customer_attributes: {
      first_name: "Valued",
      last_name: "Customer",
      email: params[:stripeEmail]
    },
    credit_card_attributes: {
      current_vault: 'stripe',
      vault_token: customer.id,
      first_name: "Valued",
      last_name: "Customer",
      card_type: card.brand.downcase,
      last_four: card.last4,
      expiration_month: card.exp_month,
      expiration_year: card.exp_year
    }
  )
Signup Flow
The customer navigates to your page, clicks the “Signup” button and fills out the popup. Stripe tokenizes the card and inserts some fields into the form, then submits it to your server. You use the token to create a customer in Stripe, and then use the ID of the Stripe customer as the vault_token to create a subscription using the Chargify API.
Card Update
To allow customers to update the card on their subscription, you can make another form with the Checkout widget, and instead of creating a subscription, create a new payment profile with the Stripe customer number as the vault token, then make that payment profile the default for the subscription with the ‘change payment profile’ API endpoint.
Alternately, since Chargify always charges the default card belonging to the customer, you can add a card to the customer on the Stripe side, and create a new payment profile using the same vault token on the Chargify side so that the card number and expiration date will match.
http://help.chargify.com/announcements/change-payment-profile.html
Other options to update the payment details on an existing subscription are: You may direct customers to the Chargify-hosted Self-Service page, the Billing Portal, or you may use the Chargify Direct card_update endpoint.
Summary
I hope that helps you get started using Stripe Checkout with Chargify! If you need more help and you have a paid account with Chargify, you can open a support ticket with them. Otherwise, if you’re on the free Developer plan, the best place to ask API questions is on Stack Overflow. There is also a list of consultants who are familiar with Chargify integrations if you need help with application design and development.
The code for this example is available at https://github.com/wsmoak/chargify-examples/blob/master/ruby/stripe/sinatra-checkout.rb and is MIT licensed.