Using Braintree JS with Chargify
Braintree offers a JavaScript Drop-In UI that you can include in your signup form to collect payment details and tokenize them so that you don’t have to handle card data on your own server. Let’s see how to integrate this with Chargify.
This is an alternative to Chargify Direct, in which you post the entire form to Chargify’s servers and they redirect the customer back to you. The Braintree Drop In UI still allows you to avoid extensive PCI compliance work (though some is still required!) and it gives you more control over the customer experience.
Prerequisites
You’ll need these things before we begin:
- A Chargify account. Sign up for a free Developer account if you don’t already have one.
- A Braintree Blue Sandbox account for testing. Sign up here if you don’t already have one.
- A reasonable comfort level with developing web applications in your language/framework of choice.
- A basic understanding of the Chargify API. Start here.
Create
To create a new subscription using credit card or PayPal account data that was captured by Braintree JS, you will need to design your own signup form and include the Braintree Drop-In UI. The JavaScript from Braintree will display form fields that collect and tokenize the customer’s card data or PayPal credentials.
Here is a simple example form:
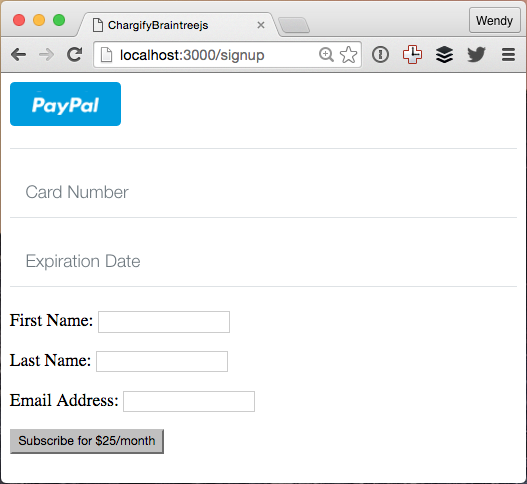
You can tell from the different styling that the PayPal button as well as the Card Number and Expiration Date fields are coming from Braintree, while the other fields belong to the example application.
I found these articles helpful:
-
https://developers.braintreepayments.com/guides/drop-in/javascript/v2
-
https://developers.braintreepayments.com/start/hello-client/javascript/v2
-
https://developers.braintreepayments.com/start/hello-server/ruby
-
https://developers.braintreepayments.com/guides/customers/ruby
In addition to the usual name, address and email fields and anything else you need to collect, the signup page needs these additional things:
Braintree JavaScript
<script src="https://js.braintreegateway.com/js/braintree-2.23.0.min.js"></script>Braintree Setup
  <script type="text/javascript">
    braintree.setup(
      "<%= @token %>",
      "dropin", {
        container: "payment-form"
      });
  </script>
Note that the client token needs to be generated on your server and inserted into the page. This is explained in the Braintree articles linked above and can be seen in the example code.
Form Container
Place this where you want the payment form to appear. In the example, it’s at the top of the form, but it doesn’t have to be.
Note that the id of the <div> needs to match what you configured as the container in the braintree.setup above.
Note also that the container must appear inside an HTML form tag, since it will be inserting a field into the form. For example:
<%= form_tag do %>
  <div id="payment-form"></div>
  ... other fields ...
  <%= submit_tag("Subscribe for $25/month") %>
<% end %>
When the form submits, all of the form fields, including the new hidden field with the nonce that Braintree inserted, will be sent to your server.
Server Side
When the form is submitted to your server, you’ll need to use the nonce that Braintree JS inserted to create a customer in Braintree.
    nonce = params[:payment_method_nonce]

    result = Braintree::Customer.create(
      :first_name => first_name,
      :last_name => last_name,
      :email => email,
      :payment_method_nonce => nonce
    )
Assuming it is successful, the result will contain a customer. The customer’s id is what Chargify needs in order to process payments and renewals, and is supplied as the ‘vault_token’.
      subscription = Chargify::Subscription.create(
        :product_handle => 'basic',
        :customer_attributes => {
          :first_name => first_name,
          :last_name => last_name,
          :email => email
        },
        :credit_card_attributes => {
          :first_name => first_name,
          :last_name => last_name,
          :vault_token => result.customer.id,
          :card_type => result.customer.credit_cards[0].card_type.downcase,
          :expiration_month => result.customer.credit_cards[0].expiration_month,
          :expiration_year => result.customer.credit_cards[0].expiration_year,
          :last_four => result.customer.credit_cards[0].last_4,
          :current_vault => "braintree_blue"
        }
      )
Alternately, if the customer has supplied PayPal credentials instead of a credit card, then the ‘customer’ from Braintree will have an array of ‘paypal_accounts’ instead of ‘credit_cards’, and you will need to supply paypal_account_attributes instead of credit_card_attributes when you create the subscription.
        :paypal_account_attributes => {
          :first_name => first_name,
          :last_name => last_name,
          :vault_token => result.customer.id,
          :paypal_email => email,
          :payment_method_nonce => "required_for_paypal_account_but_not_used_because_we_have_a_vault_token",
          :current_vault => "braintree_blue"
        }
The Chargify Subscriptions API will complain if you don’t send a payment_method_nonce, but you can supply any value because it is ignored in favor of the vault_token.
You may want to use JavaScript to capture the email that the customer supplied to PayPal and pass it into your server-side code. On the Chargify side, there is a required paypal_email field. This is only for display on the Payment Details tab, but it may cause confusion at some point if it doesn’t match the email that the customer gave to PayPal when signing up.
Signup Flow
The customer navigates to your page, fills out the form which includes the Braintree Drop-In UI as well as any additional fields you require, and submits the form to your server. You use the nonce to create a customer in Braintree, and then use the ID of the Braintree customer as the vault_token to create a subscription using the Chargify API.
Update
You can now change the default payment profile on an existing subscription via the API: http://help.chargify.com/announcements/change-payment-profile.html
Alternately, to update the payment details on an existing subscription, you may direct customers to the Chargify-hosted Self-Service page, the Billing Portal, or you may use the Chargify Direct card_update endpoint.
Summary
I hope that helps you get started using Braintree JS with Chargify! If you need more help and you have a paid account with Chargify, you can open a support ticket with them. Otherwise, if you’re on the free Developer plan, the best place to ask is on Stack Overflow.
The code for this example is available at https://github.com/wsmoak/chargify_braintreejs and is MIT licensed.
Notes
According to this article it isn’t possible to suppress the PayPal button in the Drop In UI. As long as PayPal is enabled for your Braintree account, the button will appear.